Chapter 5
Lesson 1: Exploring the desktop
Lesson 2: Using the AccuPoint pointing device
Lesson 3: Creating a new document
Lesson 4: Creating a new folder
Lesson 5: Starting programs
Lesson 6: Resizing and repositioning windows
Lesson 7: Closing your programs and files
Lesson 8: Creating shortcuts
Lesson 9: Displaying Web content in individual windows
Lesson 10: Changing the wallpaper
Lesson 11: Setting the date and time
Lesson 12: Removing objects from the desktop
Lesson 13: If I am lost--what do I do?
Getting to Know Windows 98
This chapter introduces
Windows 98 by guiding you through a few basic tasks. It also shows you
some of the new screens you can expect to see when you open basic
applications of Windows 98.
If you've never used Windows
98 before, the skill and confidence you gain will more than offset the
short amount of time you spend going through these lessons. However, if
you've used Windows 95 or Macintosh, you will already have some
familiarity with Windows 98, since the operating systems are similar.
 HINT:
If you've been using Windows 3.1, Windows 98 Help discusses a number of
the major differences in an easy question-and-answer format. To start
online help, open the Start menu and select Help. When the Help Topics:
Windows Help screen appears, select the Index tab. Type "upgrading" in
the text box, then in the topics list double-click "Upgrading to
Windows 98 from Windows 3.1."
As you gain experience with Windows 98, you will discover that there are often many ways of accomplishing a particular task.
Lesson 1: Exploring the desktop
The desktop is the launching
pad for everything you can do in Windows 98. You use its features to
start programs, find documents, set up system components and perform
most other computing tasks.
 HINT:
The screens shown throughout this chapter may appear slightly different
from the screens shown on your computer. However, the differences are
not significant and do not indicate any change in the functionality of
your system.
Finding your way around the desktop
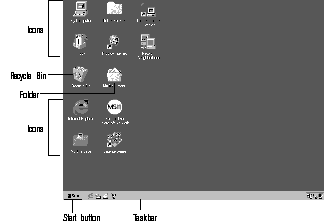
The following screen identifies the major features of the desktop.
nbsp;
Desktop
The Start button does just what it says. Use it to start programs and open documents, files, and folders within Windows 98 (see Lesson 5: Starting programs).
The taskbar lets you know
which documents or programs are currently open. It may also display the
time. The taskbar below shows the Quick Launch toolbar, which allows
you to access the Desktop and the Internet with equal ease, and shows
other programs and utilities that may have been preloaded during the
Windows 98 startup.

nbsp;
Sample taskbar with icons
 HINT:
You can change the taskbar settings by placing the cursor on an empty
space in the taskbar, clicking the secondary button, pointing to
Toolbars, then clicking your setting.
In this guide, the term
"click" infers pressing the primary button, which is the larger
AccuPoint button. Instructions requiring the use of the secondary button
specifically mention that button. For example, "click the secondary
button."
You can personalize the taskbar to include not only Quick Launch icons, but also your favorite URL addresses.
 DEFINITION:
URL stands for Universal Resource Locator, which is the address that
defines the route to a file on the Web or any other Internet facility.
Generically, it is known as the Web site address.
As you work through the lessons in this chapter, the taskbar will change to reflect what you are doing.
The icons provide shortcuts
to programs, documents, files, folders, system features, and
components. Open applications also have Forward and Backward buttons to
allow navigation through folders, documents, and Web sites.
One
special icon is the Recycle Bin. You use the Recycle Bin to delete
files and remove objects from the desktop. You will learn more about
the Recycle Bin in Lesson 12: Removing objects from the desktop.
Using the active desktop
One of the more exciting
features of Windows 98 is the ability to set up your desktop with
complete World Wide Web integration at a single click.
To set up the active desktop:
- Put the cursor on an empty space of your desktop and click the
secondary AccuPoint button.
- Point to Active Desktop, then click View as Web Page.
The Active Desktop setting appears.

nbsp;
Sample active desktop
You can configure the active
desktop setting in several other ways. For more information, refer to
the Windows 98 documentation that came with your computer, or access
online help.
Choosing a desktop style
Windows 98 provides several
ways to view your desktop and browse your files and folders. You can
choose from three different styles--the Web style, the classic Windows
95 look, or a combination of options. The view you choose determines
how you browse in Windows 98, regardless of whether you start from the
desktop, My Computer, Windows Explorer, or Internet Explorer.
- Web style
In this
view, you can browse the desktop and folders like you browse Web pages, by
single-clicking items. In the Web style view, files, folders, and
applications open in a single window, instead of in separate windows.
- Classic style
This
desktop view is similar to the classic Windows 95 desktop. You
double-click to open items, and a new window appears for each item you
open.
- Custom style
You can
also pick and choose which options you want. Custom settings include
options for browsing folders, creating window backgrounds, and selecting
and opening items. For example, you can use options from both the Web
style and the Classic style so that you double-click to open items and use
Web pages as window backgrounds.
For more information about changing your desktop style, enter
customizing the desktopon the Index tab in Windows Help.
Working in Web style
You can work in Web style if you prefer to organize and browse your computer contents using the following Web-like options:
- Single-click to browse the desktop and folder.
You click only once to open an item, just as you
click a Web link to jump. Similarly, you simply point to items to select
them.
- Show Web page backgrounds in individual windows.
You can display Web or HTML pages, as a
background. In Web style, folders with HTML content displays as a Web page
can include artwork, Microsoft Office documents, multimedia, interactive
forms, etc. Some windows--such as My Computer and Control Panel--include a
background that displays a description of each feature when you point to
its icon.
To select the Web style browsing option:
- On the desktop, double-click My Computer.
- Open the View menu, click Folder Options.
The Folder Options dialog box appears.

nbsp;
Folder Options window
- Select Web style, then click OK.
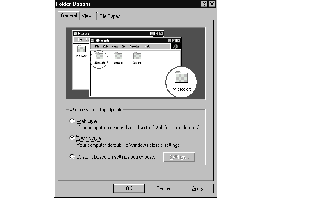
Working in Windows 95 Classic style
The Classic style resembles
the Windows 95 desktop. Using this option, you double-click to open
items, and each item opens in a separate window.
To select the Classic style browsing option:
- On the desktop, double-click My Computer.
- Open the View menu, click Folder Options.
The Folder Options dialog box appears.
nbsp;
Folder Options window
- Select the Classic style option, then click OK.
Choosing custom settings
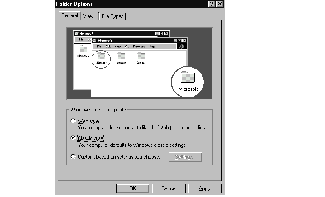
To customize browsing options:
- On the desktop, double-click My Computer.
- Open the View menu, click Folder Options.
The Folder Options dialog box appears.
nbsp;
Folder Options window
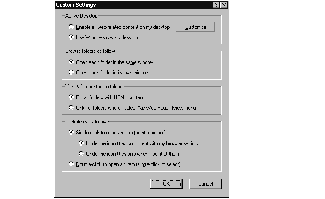
- Select Custom, based on setting you choose, then click Settings.
The Custom Settings dialog box
appears.
nbsp;
Custom style options
- Select the options you want, then click OK.
Using toolbars
You can display one or more
customizable toolbars at the top of a window. As you browse, Windows 98
detects the kind of information presented in the window and
automatically displays the appropriate toolbar buttons and menus.
You can also add the following toolbars to the taskbar:
|
Toolbar
|
Use to
|
|
Standard buttons
|
Display buttons for
commonly used commands, such as copying, pasting, deleting items,
changing views, and browsing backward and forward.
|
|
Address Bar
|
Open Web pages,
programs, folders, or documents. By default, the Address Bar shows your
current folder or a Web page location. You can browse to another
location by typing an address--a URL, a path, or even a program name.
|
|
|
If you start typing a previously typed address, the AutoComplete feature finishes the address for you.
|
|
Links
|
Go to featured pages such as the Best of the Web site, or create your own custom link.
|
|
Quick Launch
|
Open Web browsing
software, read email, view channels, or instantly bring your desktop to
the front. You can easily add a new toolbar button by dragging the
program icon to the Quick Launch toolbar.
|
The following illustration shows the various toolbars you can display.
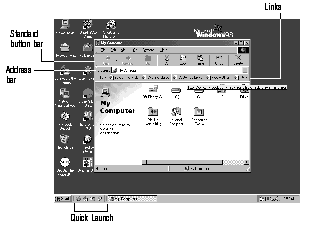
nbsp;
Toolbar locations
Displaying a toolbar in a window
- On the desktop, double-click My Computer.
- In the View menu, point to Toolbars, then click the name of the
toolbar you want to display.
The
toolbar appears below the menu bar.
Displaying a toolbar on the taskbar
- Right-click a blank area on the taskbar.
A shortcut menu appears.
- Point to Toolbars, and then click the name of the toolbar you want
to display.
The toolbar appears on the
taskbar.
Opening a web page
There are two ways to open a Web page or file using the address bar. The first is:
- On the desktop, double-click My Computer.
- On the View menu, point to Toolbars, then click Address Bar.
- In the Address Bar, type the Internet address or path, and press
Enter.
The second is:
- Right-click a blank area on the taskbar.
A shortcut menu appears.
- Point to Toolbars, then click Address.
- In the Address Bar, type the Internet address or path, and press
Enter.
Lesson 2: Using the AccuPoint pointing device
Your User's Guide introduces
you to the AccuPoint pointing device, which is your basic tool for
moving around the screen and performing computing tasks. This lesson
teaches you some of the things you can do with the AccuPoint in Windows
98.
- Move the pointer to the Start button, then click the primary
button.
The Start menu opens.
- Click an empty area of the desktop to close the Start menu.
- With the pointer in an empty area of the desktop, click the
secondary button.
Windows 98 opens the desktop
shortcut menu.

nbsp;
Desktop shortcut menu
As the name implies, shortcut
menus provide quick access to many features of Windows 98.
- Click an empty area to close the shortcut menu.
- Move the pointer to the My Computer icon, then double-click the
primary button.
The My
Computer window opens.
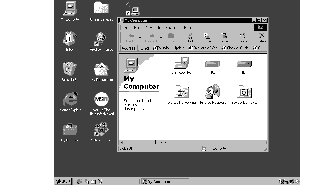
nbsp;
Desktop with the My Computer window open
- Click an empty area of the taskbar at the bottom of the screen and,
while holding down the primary button, drag the pointer to the right edge of
the desktop, then release the primary button.
You can
move the taskbar to any of the desktop's four edges.
 HINT: This process is known as "click and drag." The taskbar moves from the bottom to the right edge of the desktop.
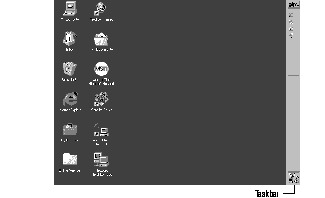
nbsp;
Desktop with the taskbar on the right
- Click the taskbar once again and drag it back to the bottom of the desktop.
Lesson 3: Creating a new document
With versions prior to
Windows 95, you had to start a program before you could create a
document. Windows 98, like Windows 95, lets you choose a file and then
opens the program associated with that file type.
This lesson teaches you how to create a text file without opening a program.
- Move the pointer to an empty area of the desktop, then click the
secondary button.
Windows
98 displays a shortcut menu of commands applicable to the desktop.
- Click New, then click Text Document.
Windows 98 creates an icon on the desktop called
New Text Document with the icon name highlighted.
- To give your file a meaningful name, type
My New File and press
Enter.
- Double-click the icon.
Windows 98 opens the new file in Notepad,
the text editor built into Windows 98.
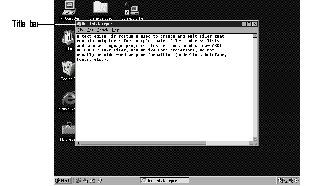
nbsp;
Notepad window
Notice that, as you open the file,
there is a new button on the taskbar that reads My New File - Notepad (the
name may be too long to fit into the taskbar space but, if you point to the
name, Windows 98 displays all of it). By displaying buttons like this one,
the taskbar helps you keep track of the programs and files you currently
have open.
To learn more about Notepad, click Start, then click Help or open the Help menu by pressing
F1. For now, leave Notepad open and go on to the next lesson.
Lesson 4: Creating a new folder
 DEFINITION: A
folder is an area where you can store types of electronic media or
data. It is analogous to a file stored in a file cabinet. In this case, the computer is the file cabinet.
Windows 98 stores documents
and programs in folders. It even stores other folders in folders. In
this lesson, you will create a folder in which to store your new
document.
- Move the pointer to an empty area of the desktop, then click the
secondary button.
Windows
98 displays the desktop shortcut menu.
- Click New, then click Folder.
Windows
98 creates an icon on the desktop called New Folder with the icon name
highlighted.
- Type a name for the folder, such as "My Folder," then press
Enter.
 Close the Notepad document you just created by clicking the Close button on the right side of the Notepad title bar.
Windows 98 displays the document as an icon on the
desktop.
- Click the Document icon and drag it toward your New Folder icon.
Position the Document icon so that the Folder icon changes color, then
release the primary button.
The
outline of the Document icon moves across the desktop and disappears into
the folder.
- To see your document, double-click the Folder icon.
A window opens and displays the contents of the
folder.
 Close the window by clicking its Close button.
Continue with the next lesson to learn how to start
programs.
Lesson 5: Starting programs
Usually, you will know which program you want to use for a particular task.
This lesson teaches you how
to start programs from the desktop, using two of the programs, Paint
and Windows Explorer, built into Windows 98.
- Click Start, then point to Programs.
Windows 98 displays a list of program folders.
- Point to Accessories, then click Paint.
Windows 98 opens Paint, a simple drawing
program.
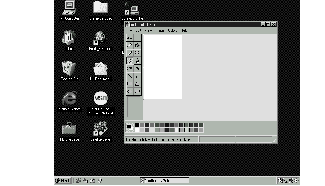
nbsp;
Desktop with Paint open
- To open the second program, click Start, then point to Programs.
- Click Windows Explorer.
Windows 98 opens Windows
Explorer, which provides access to all your computer's resources. For
example, it lets you see all the files in a particular folder on the
computer's hard disk.
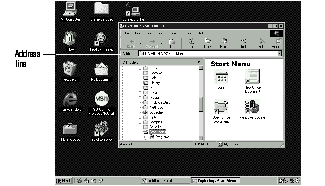
nbsp;
Windows Explorer open on the desktop
Notice the taskbar now has two
buttons on it: one for Paint, and one for Windows Explorer.
 HINT:
One of the features of Windows 98 is that some windows look like Web
pages. If you are connected to the Internet, this allows you to move
directly from this program to an Internet address by typing the URL of
the site you want to visit in the address line and pressing Enter.
- Click the Paint button on the taskbar.
Windows 98
displays the Paint program. You can move back and forth between the two
programs by alternately clicking each button.
Windows 98
places the active window on top of other windows on the desktop unless you
have positioned the windows to keep them from overlapping.
Lesson 6: Resizing and repositioning windows
If you have been following
the lessons in this chapter, you now have a screen cluttered with
several program windows. Fortunately, it is easy to create order out of
this chaos. You can resize and reposition windows so that you can see
more than one of them at a time. You can also hide windows by removing
them from the desktop without actually closing your document or program.
This lesson introduces several ways to adjust the size, shape and position of windows open on the desktop.
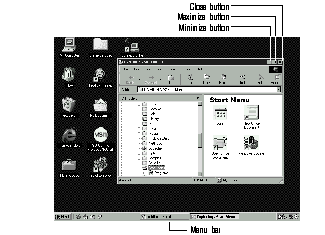
nbsp;
Windows Explorer open on the desktop
Using the taskbar
If you have applications
open on the desktop, you can rearrange them by pointing your AccuPoint
device to the taskbar and clicking the secondary button. You have the
following options:
- Cascade windows
- Tile windows horizontally
- Tile windows vertically
- Minimize all windows
Choose your option depending on how you want to setup your desktop.
Maximizing and minimizing the active window
- To make the Windows Explorer window the active window, click the
Windows Explorer button on the taskbar.
Windows 98 highlights the title bar to show that
Windows Explorer is the active window. If you are using the Cascade
option, Windows Explorer is displayed on top of the other windows.
 Click the Minimize button at the top right of the Explorer window.
Explorer disappears from the desktop. However, it
is still open, as you can see from the taskbar.
 HINT: Minimizing program windows is a good way to clean up the desktop without actually closing programs.
 Click the Maximize button at the top right of the Paint window.
The Paint window expands to the full size of the
screen, except for the taskbar. Notice that the Maximize button has changed.
It is now called the Restore button.
 HINT:
Maximizing a program is a good way to work when you are only using one
program and do not want any distractions on the screen.
Resizing and moving windows
 Click the Restore button.
Paint returns to its previous size
and location. Notice that the Restore button has changed back into the
Maximize button.
For the next few steps assume that
you want to view Paint and Windows Explorer at the same time.
- Move the pointer to the right-hand edge of the Paint window.
The pointer changes to a
two-headed arrow.
- Click and drag the edge of
the window until it takes up just less than half the width of the desktop.
- Click the title bar of the
Paint window and drag the window to the left side of the desktop.
You can move any window by clicking its title bar
and dragging it.
- Click the Windows Explorer button on the taskbar.
Windows 98 displays the Windows Explorer window.
- Click
and drag the edge of the window until it takes up just less than half
the width of the desktop, and click the title bar of the Paint window
and drag the window to the left side of the desktop to change the size
and position of Windows Explorer, placing it at the right side of the
desktop.
Now that the windows are
side-by-side, you can see how you could refer to one window while working
in the other.
Resizing and moving windows
allows you to rearrange the desktop to suit your needs. Experiment with
different sizes and placements of windows to find the best arrangement
for your work.
At this point, you have two programs open on the desktop. The next lesson shows you how to close them.
Lesson 7: Closing your programs and files
Once you are finished
working with a document or program, it is a good idea to close it.
While you can run several programs at the same time, having a large
number of programs and documents open simultaneously can slow down your
system. This lesson teaches you how to close the programs you opened
earlier in this tutorial.
 Click the Close button at the top right of the Explorer window.
That is all there is to it. Windows Explorer
closes, removing the Explorer button from the taskbar as well.
- Close Paint and the My Computer window (assuming it is still open) by clicking the Close button in each program.
Lesson 8: Creating shortcuts
By adding shortcuts to your
desktop, you can open programs or files with the click of a button. You
will probably want to create shortcuts for the programs you use most
frequently. This lesson explains how to create shortcuts to two Windows
98 accessories--Calculator and Character Map.
Creating a shortcut to the Calculator
- Move the pointer to an empty area of the desktop, then click the
secondary button.
Windows
98 displays the desktop shortcut menu.
- Click New, then click Shortcut.
Windows 98 displays the Create Shortcut dialog
box.
- In the Command line box, type
c:\windows\calc.exeand click Next.
- Windows 98 prompts you to select a name for the shortcut.
- Type
Calculator and click Finish.
Windows 98
displays the new shortcut on your desktop.
Now assume you want to create a
shortcut, but you do not know the location of the program.
Creating a shortcut to the Character Map
Now assume that you want to create a shortcut, but you don't know the location of the program.
- Click Start, then point to Find.
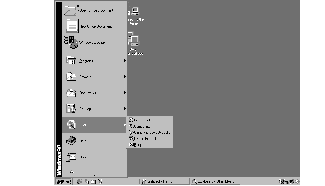
nbsp;
Desktop showing the Find options
- Click Files or Folders.
Windows
98 displays the Find dialog box.

nbsp;
Find dialog box
 HINT: Using the new Windows 98 Find feature, you can perform searches on the Internet.
- On the Name and Location tab, type
char in the Named box.
- Click Find Now.
Windows 98 displays a list of all the files
with "char" in their names.
- Click the Character Map file with the secondary button and drag it
to the desktop.
A
shortcut menu appears.
- Click Create Shortcut(s) Here.
A shortcut to the Character Map appears on your
desktop.
Clicking a shortcut icon
opens the program or folder immediately. You can place as many
shortcuts on your desktop as you find useful.
 HINT: The Character Map is a useful tool when you want to add a special character to a document.
Lesson 9: Displaying Web content in individual windows
Just as you can display a
Web page on your desktop, you can also display a Web page in an
individual window. If you subscribe to the Web page, it can be
automatically updated on a regular basis. For example, using this Web
integration feature you can monitor weather, game scores, stock prices,
or headlines--all in the window of your choice.
If you select art or a Web
page as window background, you must view that window as a Web page.
That is, to display the background, use Web style--or select the As Web
Page option from the View menu.
To add a background to a window:
- Double-click My Computer.
The My
Computer window opens.
- Open the folder you want to customize.
- On the View menu, click Customize this Folder, and then follow the instructions in the Customize this Folder wizard.
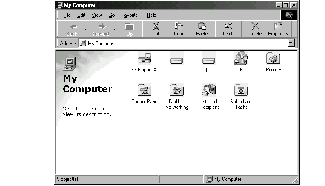
To display a folder as a Web page.
- Double-click My Computer.
The My
Computer window opens.
- Open the folder you want to view as a Web page.
- On the View menu, select as Web Page.
A window background appears.
nbsp;
My Computer window as a Web page
Subscriptions
A subscription is invaluable
if you frequently visit certain Web sites looking for new content. Web
site subscriptions work much like magazine subscriptions--you are
notified periodically of new content, according to a schedule that you
set up. You can configure Windows 98 to automatically deliver the new
content to your computer. For example, you can schedule the latest
financial news to be automatically downloaded every night while you
sleep, and it will be ready for you in the morning.
You can subscribe to any Web
page that you visit. At the time that you subscribe to a Web page,
decide whether the new Web pages are to be automatically downloaded to
your computer. You can save connection time and expense by having your
subscriptions downloaded so that you can read them offline later at
your leisure.
 DEFINITION:
Download means to receive a file transmitted over a network. In a
communications session, download means receive, upload means transmit.
Off line means not connected to,
or not installed, in the computer.
Or if you do not want the
information downloaded to your computer, you can be notified in the
following ways when new content is available:
- Smart Favorites
Your
subscription is automatically checked for updates--the icon changes if the
page is updated. You can view the icons for your subscriptions in the
Subscriptions folder.
- Email notification
A copy of
updated Web pages with live links to the World Wide Web can be
automatically sent to you as email.
To subscribe to a Web site:
- In the My Computer window, go to the Web page to which you want to
subscribe.
- On the Favorites menu, click Add to Favorites.
The Add Favorite dialog box appears.
- Select Yes, but only tell me when this page is updated or Yes,
notify me of updates and download the page for offline viewing.
- Click Customize to see subscription options.
The Subscription Wizard starts.
- Follow the wizard instructions.
 HINT:
If you have not connected to the Internet at this time, you will see
the Internet Connection Wizard before the Subscription Wizard. If you
connect now, the Internet Connection Wizard will guide you through the
steps.
To update subscriptions to all Web sites, click My Computer, point to Favorites, then click Update All Subscriptions.
To view your subscriptions,
click My Computer, point to Favorites, then click Manage Subscriptions.
The Subscriptions window starts, with a list of your subscriptions. In
this window, you can delete, update, or modify your subscriptions.
Channels
 HINT:
You must be connected to the Internet to receive Channels. If you have
not done so, click on the Internet icon on your desktop and the
Internet Connection Wizard will guide you through the steps.
If subscriptions work like
magazine subscriptions, then channels are similar to TV channels.
Instead of receiving periodic updates of the Web sites, your computer
has access to content that is always available. A channel is a Web site
that is designed to deliver content to you--the content provider
specifies what Web content is delivered and how often.
To view the content in a
channel, you can click one of the channel buttons on the channel bar.
The channel bar displays all channels installed on your computer. You
do not have to subscribe to a channel to view it. However, if you
subscribe to a channel, its button is automatically added to the
channel bar, making the content readily available. Some content
providers allow you to preview their entire Web site without a
subscription, while other sites require that you first subscribe. You
can view channels in many places--on the desktop, in windows, and even
in a special screen saver.
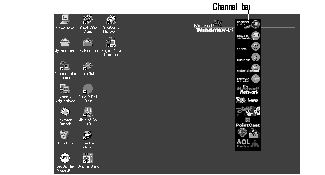
To add the channel bar to your desktop:
- Right-click a blank area on the desktop, then click Properties.
The Display Properties dialog
box appears.
- Click the Web tab.
- Select the View my Active Desktop as a web page check box, then
click OK.
The Channel Bar is added to your
desktop.
nbsp;
Channel bar on the desktop
To view channels:
- In the My Computer window, on the Favorites menu, point to
Channels, or simply click on one of the channels that appears on the
desktop.
- Point to a channel, and then click a topic.
Lesson 10: Changing the wallpaper
In addition to customizing
your computer by using TV or Web-like options, you can personalize your
desktop with pictures, patterns, or colors. Windows 98 treats all
windows, icons, programs, drives, etc. as self-contained objects. You
can set each object's properties (such as size, position on-screen, and
color) individually.
 DEFINITION: An object is an independent block of data, text, or graphics that was created by an individual application.
This lesson introduces object properties by showing you how to change one of the properties of the desktop--the wallpaper.
- Move the pointer to an empty area of the desktop, then click the
secondary button.
Windows
98 displays the desktop shortcut menu.
- Click Properties.
Windows
98 displays the Display Properties dialog box.

nbsp;
Display Properties dialog box
- Click the Background tab to bring it to the front.
- Scroll through the wallpaper options by clicking the scroll arrows
in the Wallpaper list box.
- Try a different wallpaper pattern by clicking a name in the list
box.
Windows 98 displays a sample of
the wallpaper selection in the monitor above the list box. Try several
patterns.
- To apply a pattern to your desktop, click Apply, then click OK.
Windows 98 returns to the
desktop, displaying the new wallpaper.
You can view any object's
properties by clicking the object with the secondary button, then
choosing Properties from the shortcut menu that appears.
The next lesson explains how to set the date and time properties.
Lesson 11: Setting the date and time
You set the computer's date
and time properties when you turned the computer on the first time and
set up Windows 98. To change the date and time settings now:
- Click Start, then point to Settings.
- Click Control Panel.
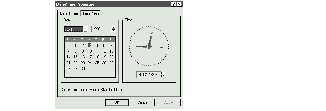
- Double-click the Date/Time icon.
nbsp;
Date/Time Properties dialog box
 HINT:
To open this dialog box more quickly, click the time display on the
taskbar with the secondary button, then click Adjust Date/Time.
- Click the Date & Time tab, then select the correct month, year,
day, and time.
- Click the Time Zone tab and select your time zone from the
drop-down list box.
- When you have finished, click OK.
Continue with the next lesson to finish cleaning up the desktop.
Lesson 12: Removing objects from the desktop
Earlier in this tutorial,
you created a new icon on the desktop. Since everything you have done
to this point has been just practice, you may want to return the
desktop back to its original uncluttered state. This lesson explains
how to remove objects from the desktop and introduces the Recycle Bin.
- Click the New Folder icon you created, drag it until it is over the
Recycle Bin icon and it changes color, then release the primary button.
The icon disappears. But, with
Windows 98, it is not really gone. It is merely set aside in the Recycle
Bin so that you can restore or delete it later.
- Repeat Step 1 for any other icons you created during this tutorial.
Each icon disappears as you drop
it on the Recycle Bin.
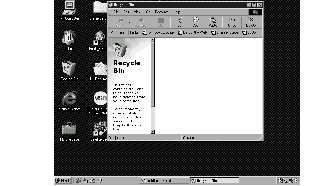
- Double-click the Recycle Bin icon.
Windows 98 opens the Recycle Bin window.
nbsp;
Desktop with the Recycle Bin open
Notice that all the icons you
dropped on the Recycle Bin are listed.
- To completely remove an object, click the item, then File and Delete.
Later on--in your real work,
not in this tutorial--you will use the Recycle Bin to delete other
objects such as folders, documents, and sometimes even programs. Still,
the process is the same. Drag an object's icon to the Recycle Bin and,
when you are absolutely certain that you never want to see it again,
delete it from there.
If you change your mind and
want to restore an object you sent to the Recycle Bin, click the object
with the secondary button and click Restore. Windows 98 restores the
object to the place from which it was deleted.
 HINT:
To delete everything from the Recycle Bin at once, choose Empty Recycle
Bin from the File menu. Do this periodically, because, even though you
deleted the item, it still uses valuable space on the hard disk drive
while it remains in the Recycle Bin.
Lesson 13: If I am lost--what do I do?
This lesson teaches you how to use some of the help features in Windows 98.
Windows 98 Help
Windows 98 has an excellent help facility. If you cannot figure something out, the answer is probably only a few clicks away.
To find help topics:
- If you have an application open, press
F1, otherwise click Start,
then click Help.
Windows 98 opens the Help window.
- If you do not see the Index page, click the Index tab.
Help displays the Index page.

nbsp;
Help window on the Index page
Most of the screen contains a list
of topics. The box above the index list, where the vertical bar is flashing,
lets you type in a topic.
In this tutorial, let's assume you want to draw a picture but do not know how.
- Type
picture in the field labeled Type the first few letters of the
word you are looking for.
Notice as you type that the topic list adjusts to locate what you typed. When you type the letter
p, the topic list
moves to the first entry that begins with P, and so on.
There are a number of topics listed under
Picture. One of them, Drawing, looks promising.
- Double-click Drawing.
Help
opens a topic screen that gives a brief description of how to draw
pictures, including an icon to start the Paint program.
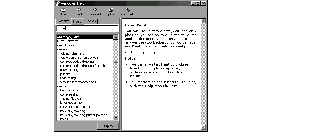
nbsp;
Drawing help window
- Click the Click Here icon.
Windows 98 opens the Paint
program.
Not every help topic
screen contains a hot link to start a program. However, when you do
encounter one, you will find it a convenient means to help you solve a
problem or answer your question by having both the program and the help
screen open simultaneously.
Troubleshooters
Windows 98 includes a wide
range of helpful troubleshooters that can assist you with many common
computer problems. For instance, if you are having difficulty setting
up a new printer, the Print troubleshooter can walk you through the
process step by step. Troubleshooters are available through Windows
Help, and they are constantly updated and supplemented on the Support
Online Web site.
You can connect to Support Online by clicking the Web Help button in Windows Help or by connecting to:
http://support.microsoft.com/support/
Using the online tutorial
No matter how familiar you
are with computers or with Windows, you will find the interactive
Discover Windows 98 tutorial helpful.
 HINT:
The Discover Windows 98 tutorial may not be installed in your copy of
Windows 98. Your computer manufacturer may have deleted, modified, or
replaced the Discover Windows 98 tutorial described in this section.
If you are new to computers,
the Computer Essentials section is a good place to start. It discusses
basic mouse, keyboard, and desktop use. If you have used computers--but
not Windows 95 or Windows 98--start with Windows 98 Overview. And if
you have used Windows 95, What's New is helpful introduction to the new
features in Windows 98.
For information about
Microsoft Press« training materials and valuable Web sites, you will
want to explore More Windows 98 Resources.
To start the Discover Windows 98 online tutorial:
- Click Start, then click Run.
The
Run dialog box appears.
- In the Open box, type
tour98, then click OK.
The Discover Windows 98 contents appear.
- Click a section name.
 HINT:
If you've been using Windows 3.1, Windows 98 Help discusses a number of
the major differences in an easy question-and-answer format. To start
online help, open the Start menu and select Help. When the Help Topics:
Windows Help screen appears, select the Index tab. Type "upgrading" in
the text box, then in the topics list double-click "Upgrading to
Windows 98 from Windows 3.1."

 DEFINITION:
URL stands for Universal Resource Locator, which is the address that
defines the route to a file on the Web or any other Internet facility.
Generically, it is known as the Web site address.


 Close the Notepad document you just created by clicking the Close button on the right side of the Notepad title bar.
 Close the window by clicking its Close button.


 Click the Minimize button at the top right of the Explorer window.
 Click the Maximize button at the top right of the Paint window.
 Click the Restore button.
 Click the Close button at the top right of the Explorer window.


